How to protect your privacy on Windows 10
Most people know that if they aren't paying for something they use, they're the product. However, when you pay for something, you want it to respect your privacy. Unfortunately, that’s not the case with Windows 10. The good news is that you can adjust your Windows 10 privacy settings to suit your needs. Here’s how to do it.
Anna Rasmussen
May 25, 2020 · 6 min read

Contents
What information does Windows 10 track?
Windows uses information like your voice patterns, search history, app statistics, and browsing habits to build up a more detailed profile on you. This way, they can analyze and improve their services, and deliver a more personalized experience across all your Windows 10 devices.:
Why should you keep all this information away from Microsoft? The problem lies with their inability to ensure that your data is stored safely. Security researchers have been grilling Microsoft about this for years. And while they’ve made some improvements, it’s not enough for you to trust that your data will stay safe.
Besides, you might just want to prevent your personal information from ending up in the hands of yet another corporation. So, let’s go over the main privacy settings on Windows 10.
Windows 10 privacy at setup
You should pay attention to privacy settings the moment you get your Windows 10 device. Use Custom Settings when you initially set up your PC. This is useful to keep in mind for all software, apps, or games you install on any device. If you can, go through everything yourself and don’t use the express settings. You might not need to change anything, but if you notice something that’s not to your liking, you can change it immediately – especially if it involves sending data to Microsoft.
Disconnect Cortana
Cortana is Microsoft’s virtual assistant, like Apple’s Siri. If left with the default settings, Cortana will collect your voice data, search history, access your contacts and calendar, and store it all in the cloud. If you want to secure your personal data, you must review Cortana’s permissions or disable it entirely.
To control when Cortana is allowed to listen to you:
1. Press the Windows key, type in Settings, and hit Enter.
2. Click on the Cortana tile at the bottom.
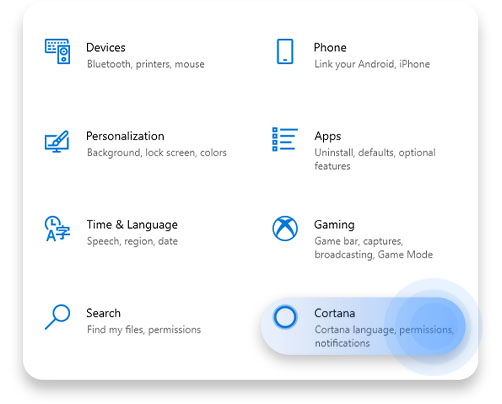
3. The Talk to Cortana window will open. We recommend setting everything to “Off.” Cortana not only records everything while you speak near your device (that’s the only way it can react when you say “Hey Cortana”), it also stores this information in the cloud.
After you’re done restricting Cortana’s access to the microphone, go over what it can see and use.
1. Go to the Permissions tab and click on Manage the information Cortana can access from this device.
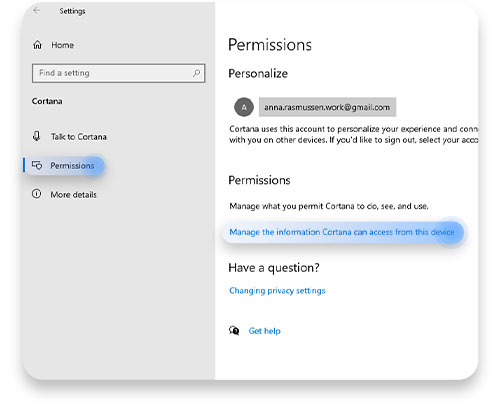
2. From there, you can block it from accessing your location, browsing history, contacts, etc.
Next, deal with personalization by disconnecting your Microsoft account from Cortana – this will stop it from collecting data any further and also delete all information it already has about you.
1. In the same Permissions tab, click on your email, and Cortana will pop up.
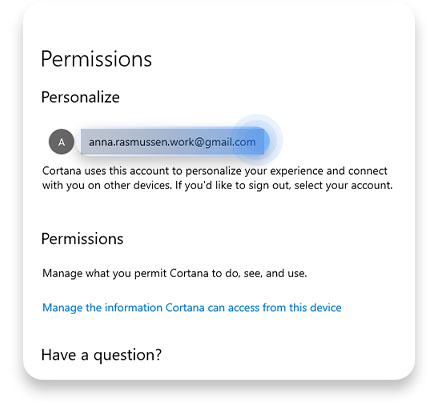
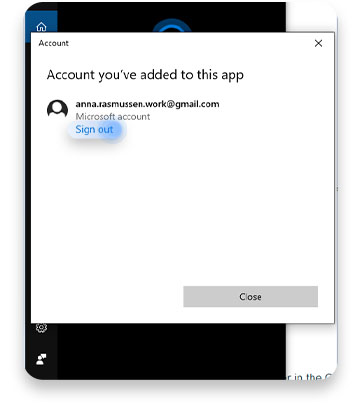
2. Click Sign out.
Review your Windows permissions
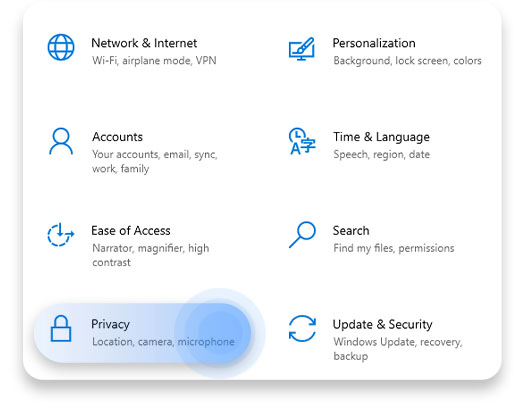
To adjust your privacy settings, return to the Windows Settings screen and click on the Privacy tile.
General
Here you will find settings for personalized content and ads, as well as tracking app launches. We recommend you keep all of these toggles Off. It won’t impact your experience with Windows 10 – it will only prevent Microsoft from collecting data about you.
Speech
Turn Online speech recognition off to prevent Microsoft from collecting your voice data. This will stop Cortana from listening to you, but it won’t block other apps from using your microphone – read on to find out how to adjust those settings.
Inking & typing personalization
The Inking and typing personalization feature records all unique words that you use, like names and professional jargon. Windows stores these in your personal dictionary to help you type more accurately.
If you don’t want Windows to know and store this information, toggle the button under Getting to know you to Off position.
Diagnostics & feedback
In this tab, you can change how much data your computer sends to Microsoft. You can’t completely opt-out, but it allows you to minimize the amount of information you send out. We recommend selecting the Basic setting. This way, you won’t give away information about your browsing habits, the apps you use, and other activities – only the most basic data about your device and how well it performs.
Other settings you should pay attention to:
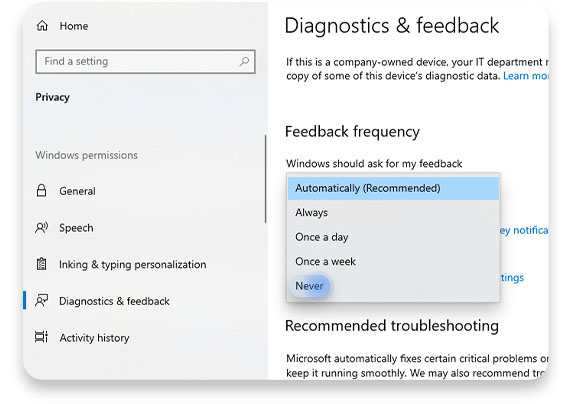
1. Opt-out of sending feedback by select Never in the drop-down menu under Feedback frequency.
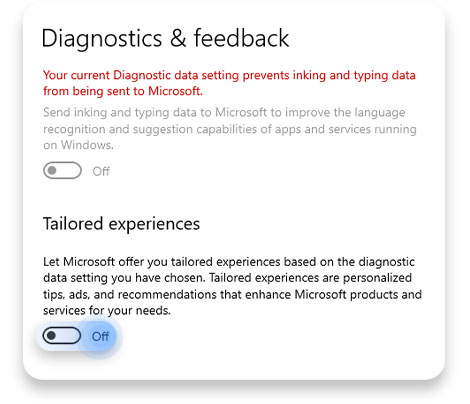
2. Opt-out of receiving personalized ads and recommendations based on your diagnostic data by toggling the button under Tailored experiences to Off position.
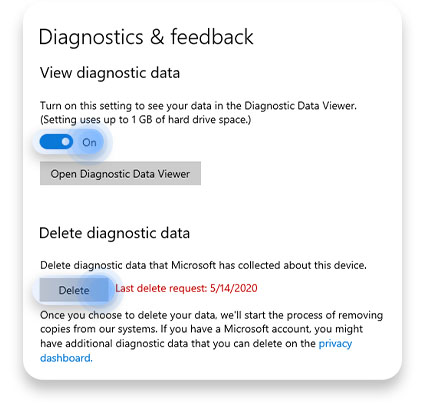
3. You can also see what information Windows has collected from your device by toggling the button under View diagnostic data. Remove it by clicking the Delete button.
Activity history
In this tab, you can stop Windows from storing your activity history and sending it to Microsoft by unticking the boxes. Sending out your activity history would allow you to pick up your work from another device. This can be a handy feature if you work on multiple Windows PCs, but it’s better to turn it off if you’re concerned about data privacy.
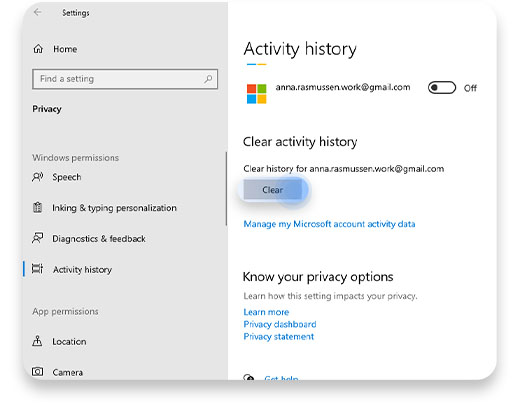
You can also delete the activity history for any Microsoft account by clicking the Clear button under Clear activity history.
Review your app permissions
You can pick which apps can access certain parts of your computer. You will find all app permissions in one place, so go over each one separately. For example, let’s start with Location access:
1. On the left-hand menu, under App permissions, click on Location.
2. First, you can turn the location tracking completely off for your device by clicking the Change button and toggling it on or off.
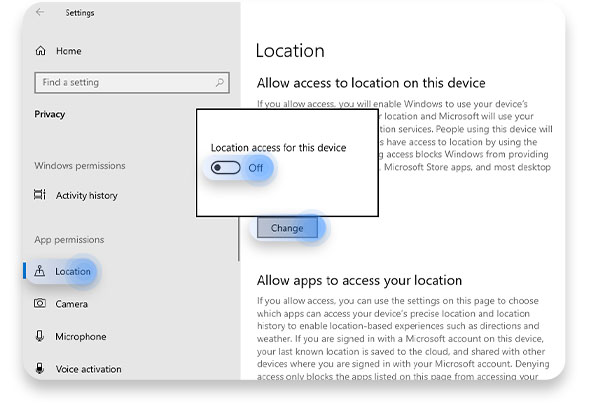
3. If it’s on, you can choose to block all apps from accessing your location by using the toggle under Allow apps to access your location.
4. You can also clear the location history by clicking the Clear button under Location history.
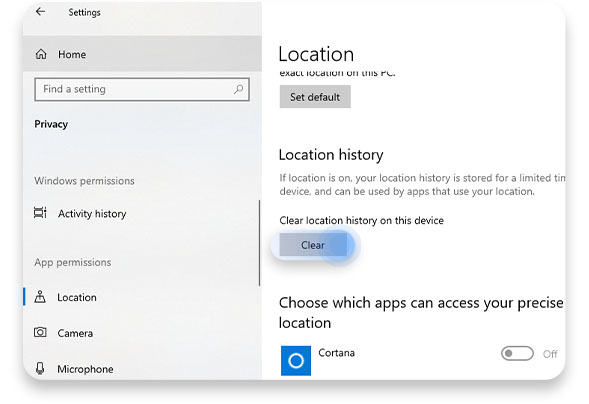
5. Finally, all apps that can use your location are listed. If you wish to allow some of them to access and record it, toggle the On/Off button.
You can now repeat the same procedure with your camera, microphone, contacts, etc. Pick which apps are allowed to access these features or block them altogether. Some apps will need access to certain parts of your device to work properly. But your weather app has no business accessing your camera, so go over these permissions with a critical eye. Mindlessly blocking everything may make your device difficult to use, so consider taking measures to protect your privacy without sacrificing functionality.
Additional measures for protecting your privacy
- Control data on other devices. After securing your PC, take time to protect your phone, Wi-Fi router, and any other smart device you might have. With the rise of IoT, our home appliances now collect and store data about us. It might seem trivial, but your apartment’s floor plan from your vacuum cleaner’s app might be useful to a criminal. Here are some tips for how to secure your IoT devices.
- Ditch Google. If you’re serious about protecting your privacy, terminating your relationship with Google is essential. It might be difficult to get rid of it, as Google has found its way into almost every aspect of our digital lives, but there are a lot of alternatives to most of Google’s services. You can find Google alternatives here.
- Tread carefully on social media. Be careful what you post online for the world to see and protect your data from social media platforms. Facebook has profiles on people who never even signed up for an account, so just imagine what they know about you if you’ve been using it for years. Review all your social media accounts, restrict access to your private data, and update your preferences.
- Use secure messaging apps. If you want your private conversations to stay that way, you should look for encrypted messaging services. To delve deeper into the world of secure messaging, read our review of the most popular encrypted messaging apps.
- Use a VPN. A virtual private network keeps you safe and protects your data while you’re gaming, streaming, or browsing the internet – even on public Wi-Fi. It’ll keep ISPs, hackers, government agencies, and advertisers away from your online data. Our Windows VPN will protect you online, and with NordVPN's strict no-logs policy, you can rest assured that no-one (including us) can access your personal information.
Protect your privacy online and stay secure with NordVPN.
